

If your PC microphone has suddenly stopped working, especially inside a specific app, the first suspect is not always the hardware or that USB cable that has been surviving on your desk for years. In Windows 10 and Windows 11, privacy permissions can cut off microphone access at system level, for modern apps and also for desktop programs, so a Microsoft Teams call, a Discord voice chat session or a quick recording can go silent even when the device is perfectly connected.
The key is to check those permissions before rushing to reinstall half the system. Isn’t it suspicious when the microphone works in one app but seems to have gone into stealth mode in another? That behaviour fits quite well with a misconfigured privacy restriction. Let’s go through the diagnosis from the most likely cause to the more technical options, without turning it into a Windows menu dungeon, although a final boss called Device Manager will appear at the end.
Check microphone permissions in Windows first
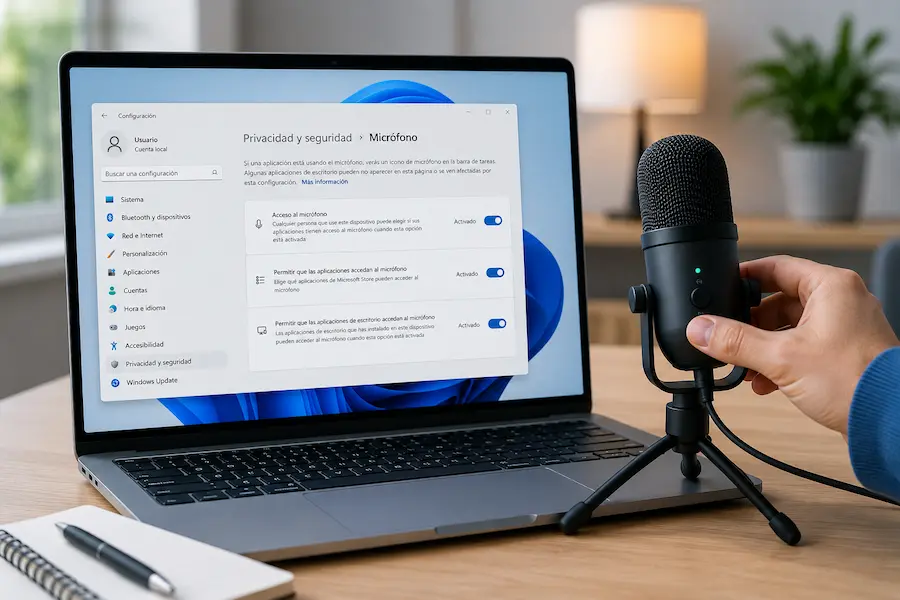
In Windows 11, open Settings with the Win + I shortcut and go to Privacy & security. In the app permissions section, look for Microphone. There are three switches worth checking: Microphone access, Let apps access your microphone and Let desktop apps access your microphone. If the first one is disabled, the PC will not be able to use the microphone; if the second one is off, apps such as Camera, Copilot, Microsoft Teams, Snipping Tool or Sound Recorder will have no audio input; and if the third one is turned off, desktop programs such as browsers, Discord or games will not be able to hear you either.
In Windows 10 the path is slightly different, but the logic is the same. Open Settings with Win + I, go to Privacy and select Microphone in the sidebar. At the top, you will see whether microphone access for the device is enabled or not; if it appears disabled, click Change and turn it on. Then check the option that allows apps to access the microphone, because it is not enough for the device to have general permission if apps are still blocked.
This first check usually solves the most common case: Windows recognises the microphone, but some privacy layer is keeping it isolated from the program you actually want to use.
Check the app, the browser and the input device
If privacy permissions are enabled and people still cannot hear you, it is time to go one level deeper. The most basic step, as unglamorous as it sounds, is to make sure the microphone is not muted with a physical button or inside the program itself. Many voice and video calling apps have their own mute control, and an accidental click can look like a system failure when it is really just the interface doing its thing.
It is also worth checking the connection. If you use a wired microphone, unplug it and plug it back in, making sure the connector goes fully into the correct port or jack, without forcing it. Then open Windows sound settings and verify that this microphone is selected as the default input device. This is especially important if you have several peripherals connected, particularly if any of them rely on Bluetooth in Windows, because Windows may choose another audio source and leave your good microphone watching from the bench.
The same check should be carried out inside the app you are using. Some programs let you choose an input device that is different from the system default, so Windows may be configured correctly and yet you may still be using the wrong microphone inside the app.
If the problem appears on a website, the browser adds another permission layer. Go into the browser settings, find the microphone configuration and check which sites are allowed to use it. If a specific page is blocked, add it to the allowed list. It is one of those small security gates that are welcome for privacy, but can ruin a meeting just after you have already said several times, I think you can’t hear me. If the call is also failing because of the connection, it is worth checking the network adapter options in Windows.
When Windows does not detect the microphone
If the microphone does not even appear as an option, the approach changes: we are no longer talking only about permissions, but about device detection. In that case, open Device Manager by right-clicking the Windows icon on the taskbar and selecting that tool. Then expand Sound, video and game controllers and look for your microphone. If it does not appear under its name, check whether it is listed as an unknown device, because Windows may not have recognised it correctly during installation.
One possible solution is to reinstall the driver. Right-click the microphone, choose Uninstall device and tick the option to also remove the driver software if it is available. Then restart the computer and connect the microphone again if it was not already connected. Windows will try to install it again automatically. If it does not succeed, go back to Device Manager, right-click the sound section and use the option to scan for hardware changes.
You can also update the driver from the same device context menu, either letting Windows search for a new version automatically or selecting a driver downloaded from the manufacturer’s website. This step is best left until the end because it is more invasive than enabling a permission, but it makes sense when the system simply does not know what is connected to it.
There is one last useful detail: if the microphone is part of a webcam, check the camera permissions too. In Windows 11 they are under Settings, Privacy & security, Camera; in Windows 10, under Settings, Privacy, Camera. Enable the corresponding access and try again. With these steps, the diagnosis becomes much more focused: system permissions, app permissions, browser, default input or drivers.


