
Scanning a document with your iPhone is much easier than it looks—and you don’t need to install any third-party apps to turn a sheet of paper into a PDF in seconds. If what you want is to digitise notes, contracts, invoices, or even handwritten pages from your phone, the most straightforward option is Apple’s Notes app, which includes a surprisingly capable scanner that’s genuinely convenient for day-to-day use.
The key is that the system doesn’t just take a photo: it detects the edges of the paper, crops the page, lets you tweak the colour, and groups multiple pages into a single file. That makes a big difference, because the result feels much closer to a real scanner than a quick, improvised snapshot—something anyone who’s ever ended up sending crooked photos on WhatsApp will appreciate.
How to scan a document from the Notes app
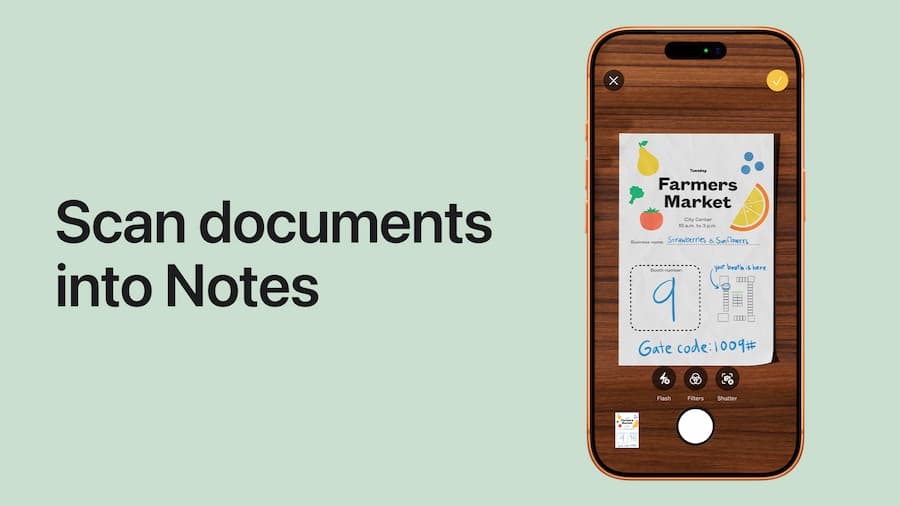
The process starts by opening the Notes app and creating a new note, although you can also use an existing one. Inside the note, tap the camera icon and choose the option to scan documents. At that point, the iPhone’s camera opens and the scanner interface appears, ready to automatically detect the sheet in front of you.
Before capturing, Apple lets you choose between several colour modes: Colour, Grayscale, Black & White and Photo. Not all of them are equally practical. For text-heavy documents, black and white usually works best; for pages with images or visual elements, grayscale or colour can preserve the content better; and if you’re scanning a photograph, there’s a dedicated mode to keep all the tones. You can also switch between Auto and Manual mode. In Auto, the iPhone detects the page and captures on its own once it’s properly framed; in Manual, you press the button yourself—useful if the document has a tricky background or detection isn’t quite accurate.
Once the sheet is in focus, the system highlights the edges with a yellow outline. If everything goes well, it saves the capture and keeps the iPhone ready for the next page. If the crop doesn’t look right, you can move the corners manually and retake the shot. Best of all, you can keep adding pages one after another without leaving the scan, so multiple sheets end up combined into a single file—like having an office scanner in your pocket, but without the 90s-era cable chaos.
How to review, save, and share the PDF
After capturing the pages, the iPhone shows a preview in the bottom corner of the screen. From there, you can review each sheet by swiping between them and check the result before saving. When you’re done, just tap Save and the scanned document will remain inside the note.
You can share that file as a PDF directly from the app. Just open the note, tap the scanned document, and use the share button. From that menu you can send it via Mail, share it over AirDrop, send it in a message, or save it to services like Google Drive or iCloud Drive. You can also store it in the Files app, either in a folder on your iPhone or in Apple’s cloud—which is handy if you want it easy to find without relying on a specific note.
What’s more, once you open the scan in Notes, Apple lets you make small adjustments afterwards, such as changing the crop, rotating the image, or switching the colour treatment. It’s not a document editing suite, of course, but for everyday use it covers the essentials without turning the task into a trip through endless menus worthy of an old BIOS.
How to scan on your Mac using your iPhone
If you work across Apple devices, there’s a particularly useful feature: Continuity Camera. With it, the iPhone can act as a scanner for your Mac and send the document straight into a compatible app. The main requirement is simple: your iPhone and Mac must use the same Apple ID, have Bluetooth and Wi‑Fi enabled, and the phone must be unlocked when you start the action.

You can use the feature in Finder, Mail, Notes, Messages, TextEdit, and also in apps like Pages, Numbers, or Keynote, among other compatible versions. To start, on your Mac, Control-click where you want to insert the document (or use the relevant menu depending on the app) and choose the option to import or insert from an iPhone or iPad. Then you’ll see Scan Documents, which automatically opens the iPhone’s camera.
From there, the flow is almost identical to scanning in Notes: the iPhone detects the page, lets you use auto or manual mode, allows cropping if needed, and shows a preview of each sheet. When you tap Save, the document is inserted or saved directly on the Mac as a PDF. It’s one of those Apple ecosystem features that, when it works well, feels almost like magic; at the very least, it avoids the usual detour of scanning on your phone, exporting, and importing the file again.
One detail to keep in mind if you store lots of documents in iCloud Drive: the free storage tier has a default limit of 5 GB. For occasional use that may be enough, but if you turn your iPhone into a portable archive for invoices, notes, and assorted paperwork, that space runs out sooner than you’d expect.
